Wavlink is a brand that offers a wide range of wireless extenders, routers and WiFi adapters. The Wavlink Extender setup can help you to extend the WiFi network by connecting your WAVLink router to an existing network or Ethernet cable. You can also use it as a standalone device for your home or office use. Below is all that you need to know about Wavlink WiFi extender setup.
Prerequisites of Wavlink WiFi Extender setup
Wavlink WiFi extender Setup requires
Unboxing of Wavlink Extender
In this section, we will show you how to unbox your Wavlink WiFi Extender. The following are the contents of the package:
First, read through the user manual carefully to get familiar with all its features and buttons. Then connect each of your devices to it via ethernet cables.
Steps for Wavlink WiFi Extender setup
Here’s how you can setup and configure your Wavlink WiFi Range extender by following some simple steps.
In the first step, you must ensure that your Wavlink Range extender is plugged into a power source. To do this, plug the adapter into an outlet (for example, one in the wall) and then plug in the power cord from your router or modem into the other end of it. Before proceeding with this step, you must have a power source for your Wavlink Range extender.
Access The Wavlink WiFi Extender setup Page
Now, we will tell you how you can access the Wavlink AC1200 Extender Setup page. WiFi Extender. If you are trying to access the setup page of your Wavlink WiFi Extender, there are two ways in which you can do so.
Download The Wavlink WiFi Extender Setup App
After the setup process, you can see that Wavlink WiFi Extender is connected to your phone. You will be able to connect your device to the Wavlink WiFi extender by scanning the QR code, which will appear on your phone’s screen.
Now, you can now enjoy all of these services on your Apple or Android device by following these simple steps:
Go to Homepage of Your Setup Portal
After connecting Wavlink WiFi Range Extender to your router and computer. You will be able to access the internet. Thereafter, clicking on the login button, you will reach the homepage of your Wavlink WiFi Range Extender. We will now proceed from here.
Type the Password and Username in the Fields
This is usually the default username and password. If you have changed them, use the new login credentials. Once again, let us tell you that the default username and the default password are “admin”.
To continue Wavlink ac600 setup:
Click on the Login Button
Now what you need to do is click on the login button so that you can proceed further. You will reach the homepage of your Wavlink WiFi Range Extender, and here, you have to select your network name from the list that appears in front of you. After selecting it, click on Connect button and wait for some time till it connects with your router automatically.
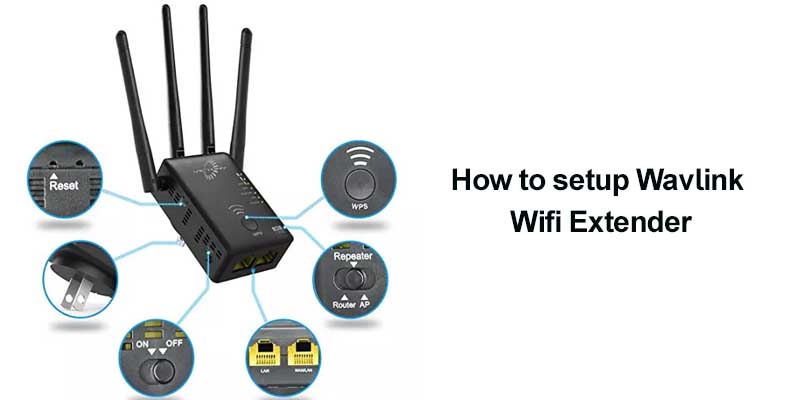
Know The Buttons
After clicking on the login button, you will reach the homepage of your Wavlink WiFi Range Extender. Once you log into your Wavlink WiFi Range Extender, you will see a page with many buttons.
Tune The Basic Settings
Now, we will see some basic settings that a user can change for their Wavlink WiFi Range Extender. So, the first thing that a user can change is the SSID or a service set identifier name of his or her extender’s WLAN network.
Next is setting up and clearing up a security key or password for your WLAN network. Then, the next thing includes changing its operating mode.
Conclusion
Now that you know how to access the setup page for your Wavlink WiFi Range Extender, we are sure that you must be able to change its settings. So go ahead and try out these steps and make your extender work according to your needs.