Wavlink AC1200 Setup
Live Chat
Live Chat with our experts & get real-time answers to all your queries.
Chat Now
With the Wavlink AC1200 setup, you can enjoy a better-speed internet connection that is free of dead zones. But, before that, you have to complete the Wavlink AC1200 setup. First, you need some basic preparations.
Preparation For Setup
A Cable For Ethernet
You should have a new Ethernet cable before starting the Wavlink AC1200 setup process. That’s because it will allow you to connect the extender to the router. A wired connection is more reliable than a wireless one.
Computer or Laptop
You will need a PC or laptop to access the default repeater URL or login page. It is possible for either device to work and deliver the desired results. Please ensure that the devices are running the latest operating system.
An Internet Browser
Wavlink wifi extender setup requires the use of an internet browser. It is your choice whether to use Chrome, Safari, Firefox, or any other web browser. To ensure that the chosen web browser is up-to-date, you must ensure that it has the latest version. It should also be compatible with the computer or laptop used for installation.
Details of Your Login
Wifi.wavlink.com login details are also important when setting up the Wavlink AC1200. You need them to log into your range extender. As a result, ensure that you have access to the default login credentials for the extender.
Power Socket
Wavlink setup should begin with a stable and consistent electricity supply. The device may suffer damage if you don’t take care of it. If you choose a wall socket, make sure there are no signs of short-circuiting.
Setup Prerequirements – Plug in the Power Adapter And Check the LED
Plug in your Wavlink AC1200 router to an electrical outlet. The LED light on the side of the device will turn solid green, indicating that it is online and ready for use. Note that LED indicates different things. For example:
If the LED is off, plug out the extender. Wait 30 seconds and then plug it back. Now check if it’s on. If it’s not lit up, send us a message.
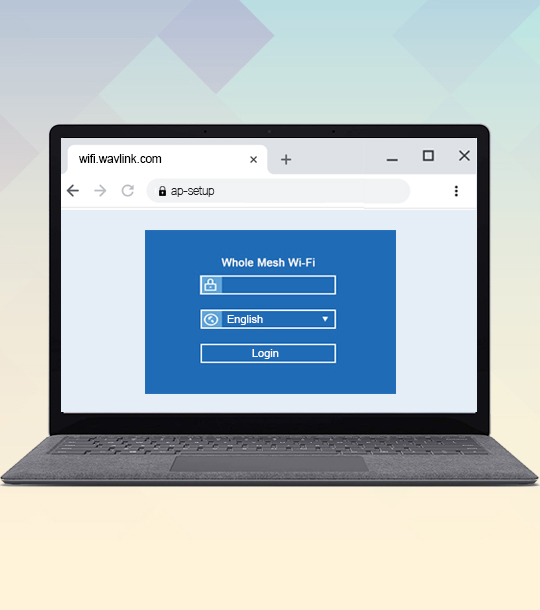
Wavlink Extender Setup Using Web Interface
First, connect the router to your computer using an Ethernet cable.

How to Setup Wavlink AC1200 Using WPS
Connect the router to the extender using an Ethernet cable, then plug it in. Then, press the WPS button on the extender and wait a few seconds until it begins flashing. Now, press the WPS button on the router. Finally, on your computer, open up a web browser and follow the remaining steps that appear on the screen.
Setup AC1200 Extender Using Wavlink Mobile Application
You can also set up your wireless extender using the Wavlink mobile application. The execution of the below steps will help you in this setup process.
Download the Wavlink WiFi App
To complete the setup process, you will need to download the Wavlink wifi app from the Apple App Store or Google Play and install it on your smartphone device. You can then launch the app and follow on-screen instructions to complete the setup of your range extender.
Connect Your Smartphone to the Default WiFi Network
Use your smartphone to connect to the default temporary WiFi network called Wavlink_AC. This network appears automatically after plugging in your range extender for about 30 seconds. It will disappear if you wait too long before connecting to it, so be sure to do it within that time frame.
Enter SSID And Password
If you are unsure of your SSID and password, they can be found directly on the bottom of your wifi router. The SSID (Service Set Identifier) is the name of your network, while the password is the key to your network. Both are case-sensitive and will be listed in any user guide or manual.
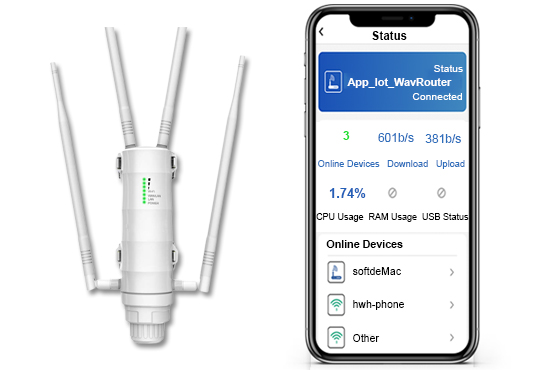
Launch the Wavlink App
Launch the Wavlink app that you downloaded and follow the on-screen instructions to complete the setup of your range extender. You should now be able to connect your devices to the extender’s network.
Common Wavlink Extender Setups
Some Issues You Might Face
If you are facing any issues then please contact us, and we will be happy to help you.
FAQ on AC1200 Extender Setup
- How do I configure my Wavlink Extender in AP mode?
- Find your Wavlink Extender’s IP address. Connect to the Wavlink Extender with a web browser, and log in to its configuration page. Click on AP.setup mode in the top right corner of the screen and select “AP mode” from the drop-down menu that appears. Then click Apply at the bottom of that page. Make sure the extender and the router are close enough together before attempting this step.
- How do I reset my Wavlink AC1200?
- To reset your Wavlink AC1200, follow these steps:
- How do I connect my Wavlink to my computer?
- Connecting a Wavlink extender to your computer is easy. To do so, you’ll need: