How To Login Into Wavlink WN531AX2 Router For Setup

wavlink wn531ax2 router

Are you looking for information on the Wavlink WN531AX2 Router Setup? If yes, then you need to follow the login steps. After this, you can easily set up your Wavlink WiFi router. The following guide will help you in this process.

Login To the Web Management Page Of Your Wavlink WN531AX2 WiFi Router

It is very easy to configure and manage the router, with the web based utility. You can use this web based utility on any window. Web browsers such as safari, firefox etc. These are built in the internal web server that doesn’t need any internet access. However, it requires that you should connect your device with the router. This connection can be either wire or wireless.

Here are the steps, which you can follow very easily:

  • You need to obtain an IP address automatically mode on your computer or laptop, to set up the TCP/IP protocols.
  • Now, link your laptop to the router with an ethernet cable.
  • After that, open the web browser.
  • Next, enter the IP 192.168.10.1 and then enter your user name and password.
  • Thereafter, click on the login.

Setup Your Wavlink WN531AX2 WiFi Router Via Manually

Here are some steps for your Wavlink WN531AX2 Router Setup. So read these following guides carefully.

LED Light Status

  • LED light Of WiFi: If the LED light of your WiFi glows solid, then it means your device is working successfully. If it is off, it means that you are not working properly.
  • LED light of WAN: If the LED light of your WAN is blinking , then it means the WAN port is connecting successfully. But If it is off, that means your WAN port is not connecting correctly.
  • LED Light Of LAN: If the LED light of LAN1/2 is blinking, that means your LAN port is receiving data. But if the LED light of LAN3/4 is off, it means your LAN port is not working properly.
  • LED Light Of Power: If the LED light of power is solid on, it means its power is on. But if it is off, that means the power is off.

Setup Guides

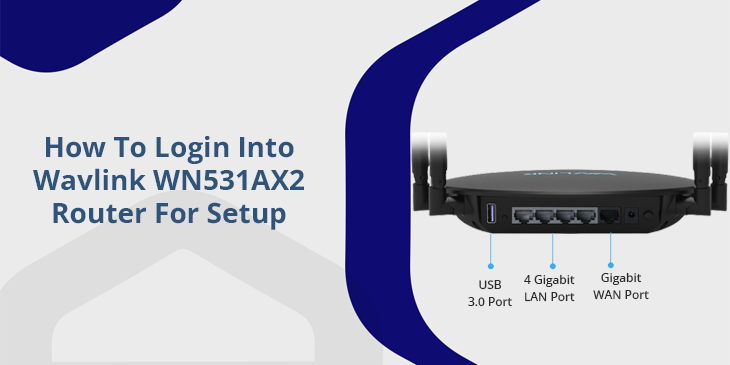
Firstly, you need to link your router’s WAN port to your internet. After that, plug it into the power socket.

Connection By Wireless

Now, Turn on your WiFi and search for the SSID name. Then try to connect it. After a while it will start configuring very simply.

Connection By Cable

In this, you need to attach an ethernet cable in the device and your laptop. After this process, you can start easily configuring.

Router Mode:

  • Now, you need to open the chrome on your device.
  • Then, go to the URL bar.
  • After that, enter wifi.wavlink.com in the address field.
  • In addition, enter the default password which is admin.

Recommendation Of Login Password:

  • Select nation and time for network protection and we recommend that you set a new login password.
  • After this process, you can follow the on screen instruction.
  • Now wait for a while, as the setup process is about to complete.

Note:

If the router’s connection is not stable after the setup,then you need to  check the firmware of your device. You need to update the firmware from time to time. Below the steps are helpful for your process:

  • First, you need to go to the official website of Wavlink WiFi router.
  • Now, download and update the new software version, which is available for Wavlink WiFi router.
  • Save your downloaded firmware file in the computer or laptop.
  • For your WiFi device go to the web interface.
  • Click on the folder of updated firmware, to upload.
  • Permits your router to carry out new changes.
  • To check updates both router and modem may reboot.

Once you do all the steps, it means your Wavlink WiFi router’s firmware is successfully updated.

In Summary

In this blog, you get the knowledge about the setup method of your Wavlink WiFi router and firmware updation as well. We hope it will help you to resolve your setup issue. In the other case, if you are facing any problem, then you can discuss it with us.