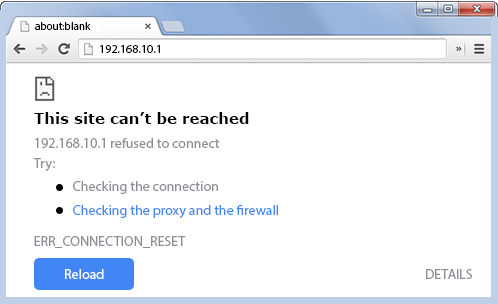
192.168.10.1
Live Chat
Live Chat with our experts & get real-time answers to all your queries.
Chat Now
Any Query?
Mail us to discuss your Wavlink issues with our experts and get the solution.
Mail Us
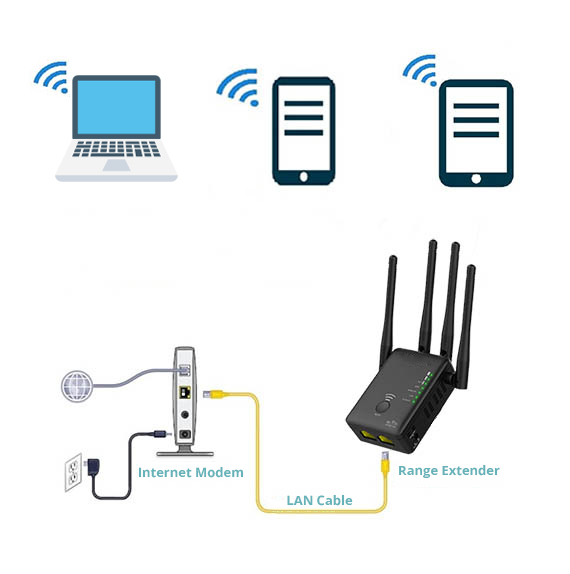
Wavlink range extender 192.168.10.1 want to set this up. This website will help you setup your Wavlink extender setup in sometime. To finalize the Wavlink WiFi extender setup 192.168.10.1 is the default gateway. Wavlink improves the overall wireless network performance it also improves the coverage area. You can take it wherever you go.
Wavlink Wifi extender boosts interface reduction to 300Mbps, and its arrangement works best for the 2.4 – 5GHz band.
Follow the steps to configure the Wavlink extender via 192.168.10.1:
- Wavlink extender should be connected to a stable source of power.
- Once you are done connecting the power source, enable the extender in the repeater mode.
- Join the designated extender network ap.setup login once you turn on the WiFi and enable the wireless device.
- The connection then requires a password as its first connection.
- Type the IP address 192.168.10.1 once you navigate to the browser.
- You will be using your default account credentials on the screen of the device as well as the passwords.
- Please, follow the directed procedures to complete the ap.setup rapidly.
- By using the IP address 192.168.10.1 you may possibly setup a Wavlink range extender.
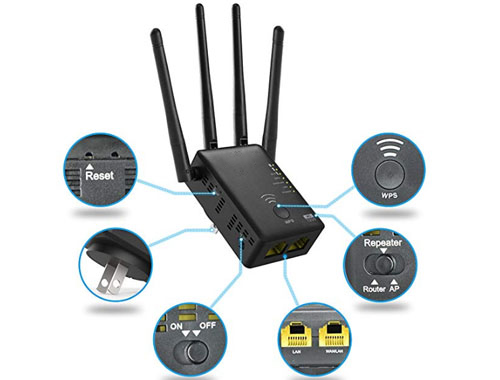
Wavlink extender Setup
- To setup a Wavlink range extender you need to insert it into a power outlet.
- Make sure that you place your existing WiFi router near.
- For ap.setup turn on your device and then enable your WiFi.
- Hold on the WPS button for few seconds on the extender.
- While you keep an eye on the connection of the two devices you have to repeat the step no. third on the current router.
- Once the two devices have made a successful communication, you can detach the extender and place at any dead zone.
- To connect to the network enable the WiFi settings on your wireless device.
- You can launch your browser once you select your WiFi network.
- Type http://ap.setup or the IP address 192.168.10.1.in the web address box.
- Username and password credentials sign in using 192.168.10.1 as you used earlier for ap.setup.
- Try to use the wizard installation option.
- Now, finally enter your Wireless Network Password.
- Follow the on-screen instructions for Wavlink WiFi Extender Setup.
- For Wavlink wifi extender setup, follow the instructions given on the screen.
Can’t connect to the IP address 192.168.10.1?
Please, follow the tips given below if you are not able to connect to 192.168.10.1:
- Firstly you need to connect your Wavlink range extender to a source of power.
- Your cellphone’s wireless settings or your laptop gets navigation when you power a LED light.
- Connect your WiFi extender network to your device.
- Enter the IP address 192.168.10.1 in the address bar when you launch a web browser.
- Now, that finally you have reached the range extender‘s login page
Follow the instructions to connect your booster to and your existing modem or router.
- Reset your booster to factory default, if the repeater has more than two LED lights.
- Hold the reset button for more than 10-15 seconds to reset the device correctly.
- To view the installation page, use the web URL wifi.wavlink.com; if 192.168.10.1 is not working.
- The default IP address will work, if you are connected to the extender network, make sure you are that you must be linked to the repeater network.
- You won’t be able to access the 192.168.10.1 IP address, if once you will install the booster.
- Contact us for free assistance to our professionals. As, you have any problem with the Wavlink extender. Via our toll free number you can easily contact us. As our experts are always here to help you any query regarding Wavlink extender.
Common Wavlink Extender Setups
Some Issues You Might Face